CTV properties section
The Properties section is the foundation of your Connected TV (CTV) campaign setup. It’s where you define the essential parameters that determine how your campaign will run across devices and environments.
Advertisers
The campaign will automatically use the Advertiser you selected when setting up the campaign in the launcher.
If you need to change the advertiser (for example, if you duplicated a campaign but it now runs for a different brand), you have two options:
-
Select an existing advertiser from the dropdown menu.
-
Create a new advertiser that matches the new campaign’s ads by clicking the New Advertiser button and filling in the required details.
Tip: Always ensure that the advertiser’s information — including name, domain, and category — aligns with the content and compliance requirements of your ads.
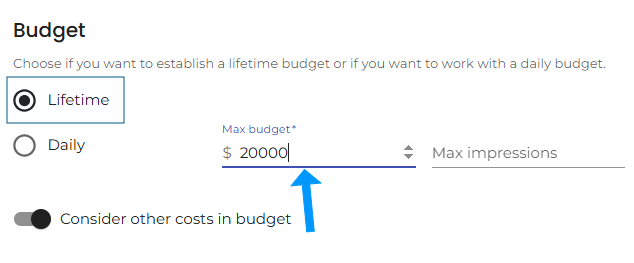
In the Budget section, you can define the maximum spend and maximum impressions for your campaign, either by lifetime or per day.
Daily Limits
Set Daily limits if you want to control how much your campaign spends or how many impressions it serves each day:
-
Select Daily.
-
Enter a Daily Budget.
-
(Optional) Set a Daily Impression Limit.
Use Daily limits if you want consistent daily pacing. If you prefer managing the entire spend over the campaign’s duration, use Lifetime limits instead.
Lifetime Limits
Set Lifetime limits to control the total spend and impressions over the entire campaign period:
-
Select Lifetime.
-
Enter the Total Campaign Budget.
-
(Optional) Set a Lifetime Impression Limit.
Your campaign will stop once it hits the first limit reached — whether it’s the budget or the number of impressions.
Example: If you set a 5 million impression limit for a one-week campaign and the campaign reaches that limit in 5 days (due to high inventory availability), the campaign will automatically stop on day 5.
Daily Limits on Top of Lifetime Limits
You can also combine Daily and Lifetime limits for more control:
-
Set your total Lifetime budget and/or impression limit.
-
Add Daily Budget and/or Daily Impressions restrictions.
The system will suggest a daily pacing value by automatically dividing the lifetime values by the number of active days.
However, you can adjust daily limits manually to fit your strategy.
Example:
A campaign has a $10,000 lifetime budget set to run over 10 days, with a $1,100 daily limit.
By day 9, it has spent $9,500.
On day 10, the campaign will only spend up to $500 before it stops.
Note: If the Lifetime Budget is exhausted before the Daily Budget, the campaign will still pause when it reaches the Lifetime value.
Lifetime
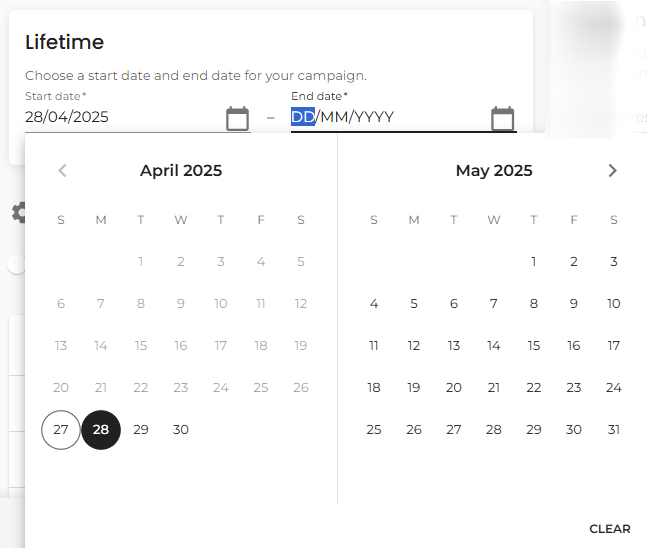
In the Lifetime section, you define the start and end dates for your campaign.
Simply select the dates using the drop-down calendar provided.
-
Start Date: When your campaign will begin running.
-
End Date: When your campaign will automatically stop.
Important:
The campaign will only be active during this selected period.
If the campaign reaches its budget or impression limits before the end date, it will pause automatically.
Tip: If you want to reactivate an old campaign, update the start date to reset the campaign tracking correctly.
Frequency Capping
Frequency capping is essential in digital advertising to maintain audience engagement and avoid ad fatigue.
It controls how often an individual user sees your ads, ensuring your campaign remains effective without overwhelming potential customers.
In this section, you can easily set limits by typing in the desired numbers:
-
Max impressions per user/day:
Limit the number of times a user sees your ad within a 24-hour period. -
Max impressions per user/hour:
Restrict the number of impressions shown to a user within an hour, offering even finer control. -
Max impressions per user/week:
Set a maximum number of impressions a user can receive over seven days.
Good Practice:
Applying frequency capping improves user experience, prevents wasted impressions, and often boosts overall campaign performance.
CTV Synchronization (Household Sync)
Sync your CTV campaign with ads on mobile or desktop devices within the same household for multi-screen engagement.
How to Enable:
-
Go to CTV Campaign > Advanced Settings.
-
Toggle “Sync the campaign with ads within the same household”.
-
Fill in:
-
Name (starts with
Sync -) -
Opportunity window (1h to 48h)
-
Lifetime budget
-
CPM or CPC
-
A synced mobile campaign will be created automatically.
CTV Tracking
The Tracking section in your CTV campaign properties lets you measure performance—one of the key advantages over traditional TV. You can track impressions and various types of conversions to optimize ROI.
Conversion types include:
-
CTV to mobile app: Ad seen on CTV, app downloaded on mobile
-
CTV to CTV app: App downloaded on CTV after ad view
-
CTV to web: Website visited after ad
-
CTV offline sync: In-store visits from CTV ads (requires sync)
-
QR code scans
Trackable outcomes:
App installs, in-app purchases, e-commerce sales, lead gen, store visits, website visits.
Client Pricing Model
The Client Pricing Model section is designed for your convenience and is used solely for reporting purposes.
It does not affect bidding behavior or campaign algorithms.
You can define a KPI (Key Performance Indicator) to easily track and compare the pricing you agreed upon with your client against the actual campaign performance.
How to set it up:
-
Open the Client Pricing Model section.
-
Select the KPI you want to apply from the available list.
-
Enter the agreed value if needed.
Available KPIs:
-
Cost Margin (in %), CPM (Cost per Thousand Impressions), CPC (Cost per Click)
-
CPA1, CPA2, CPA3, CPA4 etc.
Tip: Setting a Client Pricing KPI helps streamline your reporting and provides clear visibility into whether the campaign is hitting your target performance metrics.
Schedule & Pacing
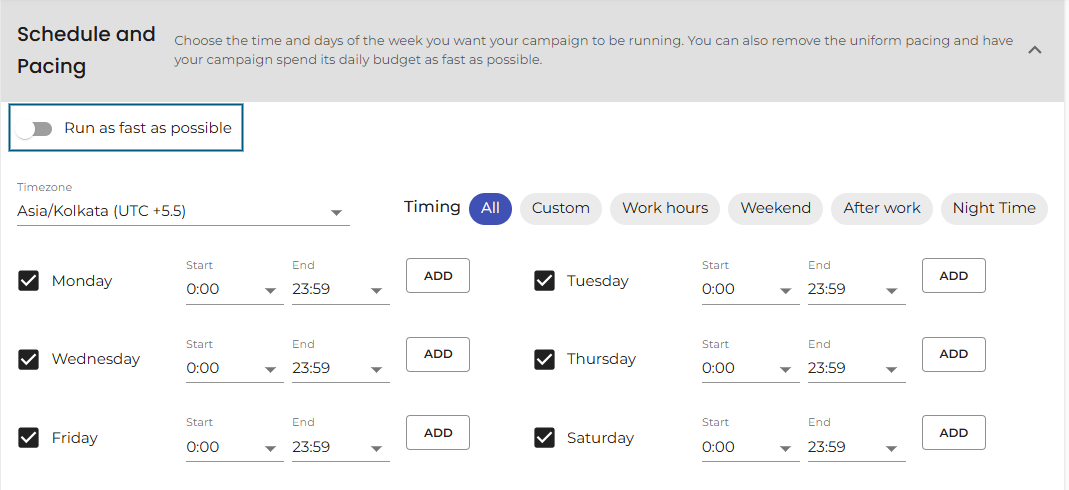
In the Schedule & Pacing section, you can define when your campaign should be active during the day or week and how it should spend its budget over time.
Scheduling
You can set specific hours and days for your campaign to run, tailoring the delivery to when your audience is most active or when your message is most impactful.
Pacing Options
Pacing controls how your campaign spends its budget during its lifetime.
1. Uniform Pacing (Default)
-
The system will automatically adjust daily spending based on your configured global limits and the campaign’s past performance.
-
This ensures steady delivery throughout the campaign duration.
2. Run as Fast as Possible
-
If you activate Run as Fast as Possible, the campaign will aggressively buy all available compatible impressions until it hits either the Budget or Impression limit, whichever comes first.
-
It does not consider the number of days left in the campaign, which can lead to the budget being spent much earlier than the end date.
Audience Builder
The Audience Builder tool allows you to easily create Interaction-Based Audiences directly from the Properties section of any campaign. This enables more precise retargeting and improved audience segmentation based on user interactions with your ads.
Interaction-Based Audience KPIs
You can build audiences based on the following user interactions:
-
Impressions
-
Clicks
-
Conversions 1 to 5
-
Video Start (users who started a video ad)
-
Video Complete (users who watched a video ad to the end)
-
Estimated Impressions
Important: You can only create one audience per KPI within a campaign.
For example, you cannot have two separate audiences both collecting Click data from the same campaign.
Liveramp Activation
Liveramp is a global company with over 10 years of experience and offices in the USA, Europe, and APAC. It has become increasingly relevant by providing RampID, a universal ID that helps identify users in inventory without device IDs and enables cross-screen targeting.
You can activate RampIDs by toggling “Empower your campaign with Liveramp.” Then, accept the T&Cs by checking “I agree with Liveramp’s terms.”


